Part four of my Converting WordPress to Web App series, as we convert this site from a standard WP website to a cache-enabled, offline-first, performance-optimized, installable Web App, that takes advantage of Build and Deployment processes, and sits safely revisioned in a Version Control repo.
The steps that I plan to take are listed below; each will become a link as I complete and publish that part of the series.
The most common way to deploy a project is easily via FTP or command line. But a former co-worker, KevinHattam, turned me on to a service called DeployBot, and it is freaking awesome!
DeployBot monitors my GitHub repo for changes, pulls in the updated repo, performs the Gulp Tasks in my gulpfile.js, and automatically FTPs my resulting dist directory to my Stage server when the Tasks are done.
Once I’ve confirmed my changes are correct on my Stage server, I click two buttons (one is a confirmation) and the same process is repeated, deploying this time to my Production server. They even offer a “one-click Rollback”, should something go awry…
They support a ton of other repos, build process options and deployment options, and I am sure there are numerous similarly-abled competitors, but this is the set-up I will be working with.
Setting-up Deploybot
DeployBot’s website states that set-up “is a surprisingly simple process” and for the most part, that is true. Once I created my account, their site walked me right through connecting to my repo, establishing an FTP connection to my Stage server, and adding my build tasks into the deployment process.
For the most part, the process was completely painless, but I did collect a few notes along the way, perhaps someone else might find them helpful:
DeployBot uses the term “environment” to represent a deployment process. I have two environments: Stage and Prod. Both do essentially the same thing, obviously deploying to different servers, and my Stage deployment is automated while my Prod is not. You could change anything between the two, including running completely different build tasks if you want to.
DeployBot uses the term “container” to represent a configuration block. If you have multiple environments and want to re-use certain configurations across multiple environments, you can create a container, and select it for each environment. Then, if you need to make changes, you make it in the container, and it automatically affects all environments that use that container. It’s basically a DRY thing.
The first URL above mentions that you shouldn’t store compiled assets in your repo, because they are hard to diff and just clutter your repo. I added all my compiled assets to my .gitignore and use DeployBot’s build process to compile them during deployment. This takes a wee bit longer, but my repo is happier for it.
While I knew that I wanted to deploy to both my Stage and Production servers, I focused first on getting Stage working. Once one environment is working, DeployBot makes it really easy to clone it to create another environment.
The default set-up is to have repo pushes automatically deploy to Stage, but require a manual deploy to Production environments; this makes a lot of sense to me, so that is how I kept mine. You can change if you are either extremely confident in your local development or just really like taking risks.
While configuring a FTP server, there is a section titled “Compile, compress, or minimize your code”: DeployBot’s ‘Compile, compress, or minimize your code’ section This is where you call your Grunt or Gulp command to start your build process. Below the code box is a link that opens a side panel displaying variables that you can use within your build tasks.
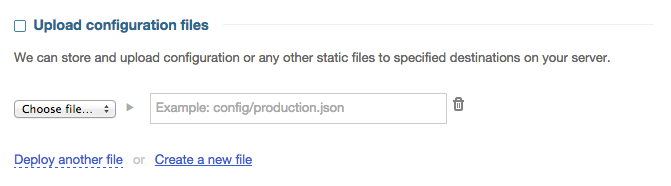
Still configuring the FTP server, is the section titled “Upload configuration files”: DeployBot’s ‘Configuration files’ allow you to upload and save environment-specific files outside of your repo This is great for anything that needs to be different on different environments, or that you don’t want to include in your repo, like your wp-config.php, robots.txt or .htaccess.
Having these files live within DeployBot is great if you can’t easily (or you just don’t want to have to) access your various environments via FTP.
You can easily edit or update these Static Files through DeployBot any time you need to, and they will automatically be updated and used for your next deployment of that environment.
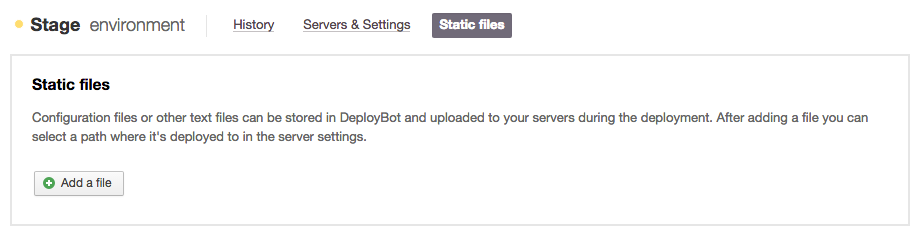
You can also access and edit these files via the “Static files” link in an environment’s Settings page: DeployBot’s ‘Static files’ allow you to upload and save environment-specific files outside of your repo
Still configuring the FTP server, a little further down the page, in the section titled “Advanced options”, there is a section titled “Source path”: DeployBot’s ‘Source path’ is your repo’s ‘dist’ directory This is a repo’s dist directory, which was slightly confusing after just adding the build process, where “source” has a different meaning… :-)
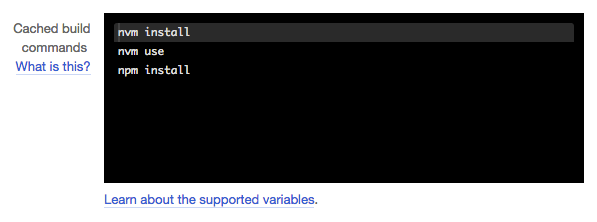
Still configuring the FTP server’s Advanced options, there is a code box titled “Cached build commands”: DeployBot’s ‘Cached build commands’ save time during your build process Add commands here that must be completed with every build to save time during your deployment process. These will not be re-evaluated until your “trigger” file has been changed. Click the “What is this?” link for more details in the side panel.
Deploying via Deploybot
Once I set-up my Stage environment, all I had to do to deploy to my Stage server was to commit and push a change to my repo.
As soon as DeployBot saw that change land in GitHub, it automatically began the Stage environment’s deployment process, which includes firing up Node.js, running my Gulp Tasks, and FTPing the resulting dist directory files to my Stage server… Voila, easy-peasy, simple as that…
Setting up a Production Environment
Once my Stage environment was up and working, it was time to set-up my Production environment. And this too couldn’t have been easier… Once you have one environment working, creating a similar, but different environment couldn’t be easier All I had to do was click the “Clone” button and DeployBot opened a pre-filled “Edit FTP Server” page. I just needed to change the FTP settings to reflect my production server and my new production deployment process was set-up.
Status Thus Far
Thankfully, after last week’s Adding a Build Process, this little puppy was nothing, right? Click a few buttons, fill in a few text boxes, and Bam! instant deployment process!
If you’re playing along, I hope you find DeployBot to be as easy as I found it to be. And if you’re using another deployment process, I would love to hear about it, what you like/dislike about it, how it compares/contrasts to DeployBot, and what made you choose it instead.
As always, you can see where we are thus far by checking out the repo on GitHub, though this will be my working repo for this conversion process, meaning it will continue to change as this series progresses. So if you are reading this much later than it was written, it may not look the way it seems it should; just keep pushing through and eventually it will!
And if you have any specific questions about my DeployBot set-up feel free to reach out to me directly or in the comments below.
Next Up
Next up I will be Adding Caching and Offline Support by adding Service Workers (and possibly App Cache), so there are a few items you may want to read-up on if you are “playing along at home”:
Service Workers are the new darling of web development, potentially changing the web developer landscape as much as Ajax did oh so long ago! If you are not already familiar with this hip new kid, you might want to do a little light reading on the subject.
There was a time when App Cache was going to provide all this wonderfulness, but it turned out to be a real douche bag (not my term, just quoting the Internet…). That said, there are legitimate reasons for adding it as a fallback, so you might want to read a smidge about it too.
Lastly, whether or not you plan to make your web app available as an installable app on mobile devices (when possible), it is a pretty cool option that some client might be impressed with one day, so some very light reading on that subject might be in order as well.