Welcome to the final installment of my Converting WordPress to Web App series, where I will finish converting this site from a standard WP website to a cache-enabled, offline-first, performance-optimized, installable Web App, that takes advantage of Build and Deployment processes, and sits safely revisioned in a Version Control repo.
These are the steps that I have taken thus far:
- Series Intro
- Adding Version Control
- Adding a Build Process
- Adding a Deployment Process
- Adding Caching and Offline Support
- Adding “Add to home screen” functionality (this post)
And now, on to…
Adding “Add to home screen” functionality
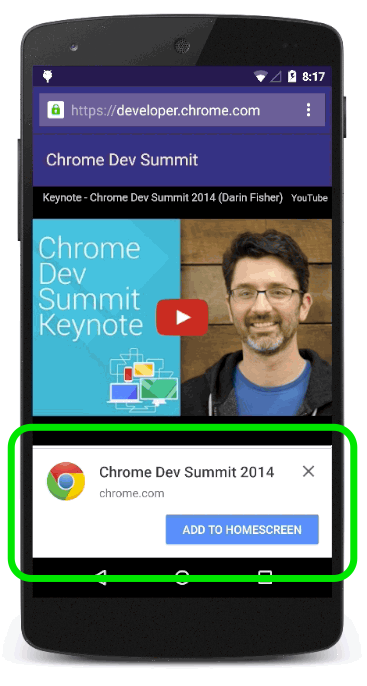
For the record, what we’re talking about here is getting this little pop-up onto a website, so users can add an icon to their device’s home screen, that basically acts like a bookmark to your website:
Exactly how to best go about this has changed a little over the years…
When the iPhone first came out, Apple told us how to add a special link and meta tag to our pages and make a specially-sized icon available. And when Android came out, they initially supported the same Apple-centric tags and methods. And Windows Phone created their own tags. Then every iPad seemed to require a new tag, and soon this turned into tag soup! Just take a scroll through Mathias Bynens‘ Everything you always wanted to know about touch icons…
But even though we developers did this, it was still up to the user to figure out if this was available on our sites and then figure out how to add the home screen icon on their device. And, naturally, that process varied from device-to-device, and all those methods were their own little version of a pain in the ass…
So instead, developers like the great Matteo Spinelli figured out how to create a custom pop-up with some script to try to help your users do this. Which is nice, but is now frowned upon because there is no way to tell if a user has already installed your app or dismissed the pop-up. (You can of course set a cookie, but we all know they’re only so reliable.) So you ended up with the possibility of someone that did install the app, or dismissed it, still getting the pop-up.
The current best practice is nicely documented by Google, and involves just a few simple steps:
- Your site needs a manifest file, which is a simple, static JSON file in your root directory. Jeremy Keith offers his as a nice, simple example, though other sites claim that a
"short_name"parameter is required, which is missing from Jeremy’s… - Your site must have a registered Service Worker. Oddly, it can actually just be an empty JS file that does absolutely nothing, you just need to register one.
- Your site must be served via HTTPS. This is a requirement to register the Service Worker, and it just makes good sense.
- With all of the above in place, a user must visit your site twice over two separate days within two weeks. The idea here is that first-time visitors are not faced with “INSTALL ME!” style messaging, and if they come back in that period, then they probably like the site, so now let’s offer installation. (This makes testing pretty difficult, so Chrome offers a flag that bypasses this restriction; enable
chrome://flags/#bypass-app-banner-engagement-checks.)
And that’s it, this just works. In Chrome. On Android. Only. Hopefully other browsers will start following some similar pattern, ideally based on the same simple requirements. But for now, this is the method I will be following. It is, after all, just another progressive enhancement item, to me. If you have a project that requires this feature, then I would recommend going with Matteo’s solution above.
Creating the manifest.json File
If you’re at all like me, reading the W3C spec on the Web App Manifest might be enough to put you off of this step. Instead, I once again started with Jeremy Keith and the manifest file he created for his site.
The only adjustment I made was adding the possibly-required "short_name"; here is my manifest.json:
{
    "lang": "en",
    "short_name": "Atg.com",
    "name": "Aaron T. Grogg's website",
    "icons": [
        {
            "src": "favicon-144.png",
            "sizes": "144x144",
            "type": "image/png"
        },
        {
            "src": "favicon-300.png",
            "sizes": "300x300",
            "type": "image/png"
        }
    ],
    "start_url": "/",
    "display": "browser",
    "background_color": "#ffffff",
    "theme_color": "#ffffff"
}
I think the only items worth really discussing are the "start_url" and the "display". The "start_url" tells the device which page to open when the icon is selected, and the "display" tells the device if it should open in a regular browser window (with visible controls, as I would like my site to), or one of the other three options.
With this file ready and added to my repo’s /dist directory, I need to add the following link tag to my site’s header.php file:
<link rel="manifest" href="manifest.json">
It is worth noting that the above link has only been supported in Chrome since version 39. Prior to that, since version 31, you would have needed the following code:
<meta name="mobile-web-app-capable" content="yes">
It is up to you if you want to add that as well.
Adding Service Worker and HTTPS
Since I already set-up a Service Worker in a previous installment in this series and set-up HTTPS in another previous post, that’s all there is to this installment!
So all that is left is to visit the site, either with the Chrome restriction-bypass flag enabled, or following the time period restrictions, and wait for the “Add to Home Screen pop-up to appear!
Miscellaneous Notes
The Google Chrome GitHub repo offers a slew of varying code samples that you can click through. The documentation for each is in the index.html file in each sample, sadly not in the readme.md files where it would have been more easily reviewable.
The Google Developers site offers another in-depth walk-through, though this one also deals with installing native apps, as well, so not everything applies to this topic. The FAQ section has a few good points worth being aware of, like how to prevent the banner from displaying and how to detect if a user tapped the “Add” button. It is currently not possible to know if the app is installed or force the appearance of the “Add” message.
In addition to Matteo’s JS script referenced above, he also offers that script nicely wrapped in an easily configurable WordPress plugin. So, again, if you need this functionality for a project, and you’re using WP, this might be a nice route!
Status Thus Far
This week’s installment completes this series. Just a little over a month ago, this was a standard WP website, where I made manual edits and uploaded them via FTP. There was no Build Process, no Deployment Process, and my code was not even in a repo!
Now, I edit files locally and commit them to my repo, where my continuous integration process automatically triggers a build process that performs file concatenation, minification, and optimization, removing unnecessary CSS prefixes from any CSS files I have, and adding prefixes that are still needed, before determining my site’s critical CSS and pushing that into a file, then deploying the resulting code base to my Stage server for review. When I’m happy with that, one click deploys to my Live server, where a Service Worker automatically caches necessary assets into the user’s browser to improve page load speed and provides offline access to the most recent posts on my site. Return Android/Chrome users are also offered the option of installing a link to my site on their home screen, just like a native app.
That’s a pretty huge improvement for this old site! :-)
You can see all of the changes that I have made by checking out the repo on GitHub. This will continue to be my working repo for this website, so things will continue to change as this site progresses. So if you are reading this much later than it was written, it may not look the way it seems it should; just let me know if you have any questions on anything you see!
Next Up
There are so many options that I have no idea what I might try to conquer next…
With a Service Worker installed, I could easily enable push notifications to notify users with the installed app of new postings…
I mentioned at the end of the last installment that I wish my cache list was dynamic, so maybe I will look into that…
I would also like to find a way for WordPress to automatically create WebP-versions of all the images I upload, so I could then also use Service Worker to send the better-compressed images to browsers that can support them…
I really should dig into all of the Gulp Tasks out there to see if I can improve my Build Process in any way…
So, yeah, the possibilities are pretty endless… But you can be sure that whatever I decide to tackle next, will be documented here. :-)
Thanks for joining me on this journey, and happy Web Apping,
Atg
Is your git hub a new ‘add to homescreen’ plugin?
Hey, Functionmunchkin.
The “Add to home screen” functionality has been added to my WordPress site, which can be found on GitHub.
However, all the functionality described in this series is pushed together in the single repo, so it might be a challenge to find just the parts you would need to add it to your site.
That said, the article does walk through everything you would need, so that might be the best way to go…
Atg
Hi ,
Thanks for the nice idea,
i want to put complete wp site using cache , if there is no network connection it should fetch from cache if network is available it should first render from network then cache the site
Sounds like a great plan! Good luck! :-)
How long did this entire process take you? I’m looking to convert the website of my study association to a web app and this article seems like a good guide!
Hey, Ramon.
Good question, wish I had documented that stat, seems like it would be really useful…
However, I did not, and I also did not sit down and knock it all out at once, but in bits and pieces. Additionally, I was sort of figuring things out with a lot of trial and error before I got what I wanted working how I wanted it.
If I had to make an estimate, I would say these phases took about this long:
Hope this helps, and thanks for the nice idea!
Also, please let me know if you feel, after doing all this, if any above times were absolutely crackers. I did all this quite some time ago, and am basically going on best-guess/memory… :-/
Cheers,
Atg
Can’t wait to go back through this guide and follow along. Thank you for sharing taking the time to create it!
I’m curious – have you had any troubles with the build / deployment process since you published this? I’ve become more familiar with that process over the last year and a half at my work, but seems a little scary to me to try it with a WordPress website.
Thanks again for sharing your knowledge on this topic!
Thanks for the note, Nick.
While I have not worked on this site for some time (new job), I did use the build/deployment process quite a few times, and it always went smoothly!
If at all possible, I would highly recommend building and testing this in a dev environment. That way, no stress.
Best of luck!
Atg